I am an artist/sculptor based in Carmartheshire, Wales. I graduated with my B.A. Honours in Sculpture in 2004, from the West Wales School of the Arts, and since then I have been persuing my artistic career. I have been working in the art college for the past 7 years, as part of the Learner Support Team.
In my role I work with students who have specific learning diffficulties, helping them to achieve the requirements of the course on a par with their peers. Being in this environment helps to develop my own artistic knowledge and skills. I have access to many materials and processes that otherwise would be difficult to come by.
Working with cast metal is prevelent within my work, and bronze or cast iron is usually mixed with natural elements. I see my art as a form of play, giving me the opportunity to explore the relationship between the organic and the man-made.


My First Broomhill Post
My first post is to say a big 'Thank You' to all that were involved in the selection process. I am really excited to have been chosen for the Broomhill National Sculpture Prize Exhibition 2011 and I look forward to all that it involves. I look forward to keeping everyone up to date with how my sculpture/creative process progresses.
But for now, If you are interested in seeing some of my earlier work? please visit my other gallery blog:
odishow.blogspot.com by clicking on 'My Gallery Page' link to the right.
See you in a bit :)
Lee Odishow
But for now, If you are interested in seeing some of my earlier work? please visit my other gallery blog:
odishow.blogspot.com by clicking on 'My Gallery Page' link to the right.
See you in a bit :)
Lee Odishow
From the start..
I suppose I had better start from the beginning.
I applied for the Broomhil National Sculpture Prize competition last year, but I was unsuccessful. My proposal consisted of images of small scale sculptures (examples of my previous work)and working drawings of a large scale sculpture that I was intending to create. My experience of large scale art was made up of past work I had done with other artists/sculptors, but I had no sculptures of my own to show. This got me thinking...it was time to put my efforts into larger pieces of work.
Last year i had the opportunity to attend the International Conference on Contemporary Cast Iron Art, in Kidwelly, Wales. This conference was a chance to spend 4 days working on cast iron sculpture.
In the week leading up to the conference, I was interseted in working on a figurative piece that I could take with me and work on.
One of my many interests is in death rituals. I am intrigued by the different ways, people across the world, treat and have treated their dead. I am drawn to all forms of ceremonial practices, from the bog bodies of Europe, to sky burials to the mummies of ancient Egypt. The imagery of sarcophagi and wrappings formed the basis of my concept.

Generally within my sculpture, I combine man-made industrial elements with organic elements. You can see this within these sketches, with the relationship between the fluid form and the mechanical 'fixings'.
The Figure
Once I had done some quick sketches, I had a feel for the piece, I set to work on the plaster 'Model'. This was to be the object that I would use to make my moulds. The image below shows the work in Progress . I began with an armature made of fencing wire, and clothed this in scrim and plaster.

Below is the finalised form with an MDF 'porthole' set into the plaster. The finished surface of this piece is reminniscent of smeared mud or clay. I wanted to give it that hand made mummy case feel, as if a shaman or relative had 'wrapped' our figure.

The Conference
Conference time. The conference week followed, the first job I had to do to begin making my moulds was to disect my model into it's two speperate parts. To do this, a ran a 4inch grinder with cutting disc all along the seam line which I had established earlier.

The seam line follows the widest point of the model. In the picture above you can see where I had drilled the bolt holes and recesses. These points were to accomodate the bolts that would be used to hold the piece back together once the component parts where cast.
Mould Making and Casting
I use many types of mould in my art practice. I am accustomed to using CO2 sand while Iron casting. To make CO2 sand, ordinary kiln dried builder's sand is mixed with sodium silicate (aka liquid glass), this mix is rammed into your cope and drag (mould box) and 'gassed' with CO2.The CO2 reacts with the sodium silicate and makes the sand very hard.

Above: These are my two moulds in progress, you can see the discarded model on the floor, these have served their purpose and are no longer needed.

Above: These are the finished moulds, I had piled stone and blocks on top of them to stop the weight of the iron pushing off the lids.
Below: All dressed up with nowhere to go! Posing in my pour gear we all prepared to pour the long line of moulds. In the background you can see the cupolette used to melt our iron.
Most moulds that I have worked on get poured using only one ladle full of Iron, mine were designed to take two ladles at a time; Thats four ladles of iron, and approx 400lbs of iron. Heavy.


The two ladle mould proved to work vey well..... for one half of my piece; and the other half? well there were complications that meant only a qurter got poured on one day, which meant we had to do it all again the next day to get the piece done. The college team that I worked with, all rallied around to make it happen. The 'complications' meant that I ended up with a three piece sculpture instead of a two piece, but i will come to that later...

Above: These are my two moulds in progress, you can see the discarded model on the floor, these have served their purpose and are no longer needed.


Above: These are the finished moulds, I had piled stone and blocks on top of them to stop the weight of the iron pushing off the lids.
Below: All dressed up with nowhere to go! Posing in my pour gear we all prepared to pour the long line of moulds. In the background you can see the cupolette used to melt our iron.
Most moulds that I have worked on get poured using only one ladle full of Iron, mine were designed to take two ladles at a time; Thats four ladles of iron, and approx 400lbs of iron. Heavy.


The two ladle mould proved to work vey well..... for one half of my piece; and the other half? well there were complications that meant only a qurter got poured on one day, which meant we had to do it all again the next day to get the piece done. The college team that I worked with, all rallied around to make it happen. The 'complications' meant that I ended up with a three piece sculpture instead of a two piece, but i will come to that later...
Iron

The tough job of breaking open the sand mould to, hopefully, reveal your prize.

This is the back half of the sculpture, and hopefully gives you all an idea of scale.
This side poured well and as expected, but as i mentioned previously the front half was in two bits.
My Proposal
Since the conference I had little time and funds to get on with my sculpture, plus I had no home for it. So progress was slow and minimal.
When the Broomhill NSP application time came around again, I felt that this would be the perfect time to 'resurrect' this piece.
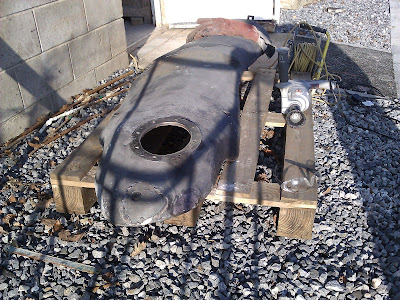
My tactic this time around was to send in photos of the piece in it's raw state and allow the judging panel to see what I had. Using photos of the original plaster form, and iron bits I was able to put together an image of what the final piece should look like.
 The image above shows the three pieces as they were when I sent in my application. The bolt holes were meant to be used to fix the pieces back together, but inevitably, the didn't line up; The bolts also wouldn't have been strong enough to support the weight of the top half sitting on the bottom half, and any movement would result in the iron cracking.
Above: Here you can hopefully see the seam line that now runs across the front of the piece, this was unintentional and due to the pouring complications, but it makes the piece all the more interesting and works well with the concept.
The Face Mask
The face mask was always going to be bronze. My initial feeling was to put a skull in the 'porthole' of the sarcophagus, but this is too obvious, macarbre and it can alienate some viewers. So the next best solution was to have a plain polished 'dome' for a face.
To make the dome, I used the original MDF former and pushed it on to an inflated latex glove, this formed the perfect domed oval. This former was then covered in plaster and once set, formed the mould for my wax version. The wax was then used to make a sand mould (quicker than the normal 'lost wax' investment process).
Below: This is the raw bronze straight out of the CO2 sand mould. Technically this is a rubbish cast, what with the holes and all; This is because I was asking too much of the metal, and I should have had more air vents (school boy error, less haste next time). Having said all of that without these imperfections I would not have realised how beautiful they are, and the fact that they mirror the seam in the cast iron, I couldn't of asked for a happier mistake.

I have placed the bronze face within the porthole to see what it looks like, it's not bolted in at this point but and the porthole is very shiny but this will all be addressed at a later date.

To make the dome, I used the original MDF former and pushed it on to an inflated latex glove, this formed the perfect domed oval. This former was then covered in plaster and once set, formed the mould for my wax version. The wax was then used to make a sand mould (quicker than the normal 'lost wax' investment process).
Below: This is the raw bronze straight out of the CO2 sand mould. Technically this is a rubbish cast, what with the holes and all; This is because I was asking too much of the metal, and I should have had more air vents (school boy error, less haste next time). Having said all of that without these imperfections I would not have realised how beautiful they are, and the fact that they mirror the seam in the cast iron, I couldn't of asked for a happier mistake.
I have placed the bronze face within the porthole to see what it looks like, it's not bolted in at this point but and the porthole is very shiny but this will all be addressed at a later date.
Making The Pieces Fit (February)

I have spent the last couple of evenings trying to line up the two halves. This process involves me placing the halves together, marking the high/low points and then grinding them away. This is then repeated as necessary. My grinder marks are then made less obvious by using the air powered die grinder.
 This is my 'To Do List', this is all I can think of at the moment but I'm sure more things will come to light, all I need to do now is start ticking them off.
The Internal Frame Work (Feb)


I've started to construct the internal angle iron frame. This frame is integral to the sculpture, and is the structure that holds all of the pieces together; Without the frame the pieces could move and potentially put too much pressure on the cast iron forcing it to crack. The frame is welded directly to the bolts that are set within the cast iron sections.
Feb 21st - 25th


This has been a great week for me, as it is half term in the college, so I have been able to spend 5 days from 9am 'til 4pm just working on my sculpture. The images above show the frame that holds the front halves together and how the piece looks from the front now.


This is the technique called 'cut and shut' (thanks Bob). This involves strapping the pieces together and running a grinder between the halves. After hours and hours of grinding it was possible to get the pieces together very tightly.
Feb 21st - 25th (continued)

Here you can see that I have used 2 coats of red oxide paint which is a measure to help detere rust from forming inside the piece, although this is pretty futile because rust will form eventually, it's the nature of cast iron.

I really like this image, it shows the two halves (unstrapped) as they would sit naturally and it has this wonderful revealing effect. But.....

At this point I have realised that I should have taken a little more time in making the frame inside, beacause the opportunity to show the internal space of the sculpture is there.

This is pretty much how the finished sculpture is going to look but there is still a long way to go (surface finish, face mask polishing, patination, welding,..........etc etc etc).
Face (early March)


These images show the comparison between the un-polished and polished surface of the face mask. to polish the bronze I use differing grades of wet and dry paper finishing with ordinary cartridge paper, with a final buff with the buffing wheel.
 This is the cold patination chemical I have used to patinate the bronze. This patina, as it suggests, is applied to cold bronze.
 This is the surface of the bronze 15 mins after the patina was applied. I went on to apply 3 more coats building up the green around the circumference of the oval.
Surface Finish (March)
This evening I took the opportunity to take the pieces out side and work on the surface. Initially I wanted to sand blast the sculpture to remove any sand left over from casting process, but the logistics of finding and hiring a sand blaster meant that it was easier to treat the sculpture myself. I moved the pieces outside to use a wire brush, drill attachment; This tool takes off the excess sand and helps to unify the metal.


The pic below hopefully shows how the surface is clean and unified after the wire brush treatment.

Kurust

Kurust, this product is usually used on car parts to protect against rust and is used to prepare metal for paint.
 I applied the Kurust all over the surface of the iron. Although alarming, the metal instantly turns this weird purple blue colour; Luckily I have used it before so I knew what to expect.
 Close up of the purple aubergine.
 After 20 minutes or so, the colour starts to dull down until it goes black, and this is usually when you paint your metal. I have chosen to leave the sculpture black, but at the moment it is too dull, so in a bit I will sand back little bits of the surface to show up the finer details and highlights.
Shiny Bits
 Here you can see where I have started to address the metal, as I mentioned earlier, the Kurust leaves the metal a matt black colour which is too dull, but this is easily sorted with a bit of wet and dry paper.
 Initially I wasn't going to polish the 'belly', but I seem to have a compulsion to rub it when I am near the piece; Rubbing the belly began when the piece was originally in plaster and it makes me think of objects around the world that apparantly give you 'good luck' when they are rubbed. I like the idea of the viewer being able and willing to interact with my sculpture, rubbing it for luck. As for MY compulsion, I put this down to it being like my baby, my first large piece, and also just because I feel that it is a tactile sculpture.
Bolts for the Porthole

These are the bolts for the porthole, but because they are zinc coated they are too silver, I was going to sand blast them and then Kurust them to get a darker finish.
 I decided that the sand blast/Kurust process was a bit too long winded, then I remembered that it was possible to heat up the bolts. Heating up the bolts to a nice yellow heat burns off the coating and leaves them darker. The oxy acetaline torch was perfect for this process.
 I placed the bronze face into the porthole to see the effect, it isn't bolted in yet as the two cast iron halves need to be welded together, but the bolts match the iron exactly.
Blog Part 2 (Blog Continued)
To see the rest of my blog please click on the address below:
http://www.leeodishowsculpture.blogspot.co.uk/
or
click on the link at the top right of this page titled:
Blog Part 2
http://www.leeodishowsculpture.blogspot.co.uk/
or
click on the link at the top right of this page titled:
Blog Part 2
Subscribe to:
Posts (Atom)